Template locking is a way to define which project elements cannot be changed by the template's end users.
Locking a template is the second step in creating Brandfolder templates.
Template locking allows template creators to maintain brand integrity while allowing the freedom to customize designs. Locking gives your users a simple workflow to make quick and professional designs for them to use in any context.
Setup locking settings
Once you have finished building out your project, you can apply template locking settings. These settings can be applied to any project prior to publishing.
- On the right-hand side, expand the menu and select Locking.
- Toggle the switch to turn it on.
In the Locking Mode dropdown, there are three options:
- Design Mode takes you out of your locking settings and allows you to adjust the design on the canvas.
- Configuration Mode allows you to set your actual locking settings.
- User Preview Mode allows you to see what your users will experience with the locking settings applied.
Configuration Mode
In the Configuration Mode, you can apply options to the entire template. In the Lock Controls section, you can lock (and unlock) text, images, shapes, and the background.
In the Paging section, you can lock (and unlock) the ability to add, clone, or delete pages.
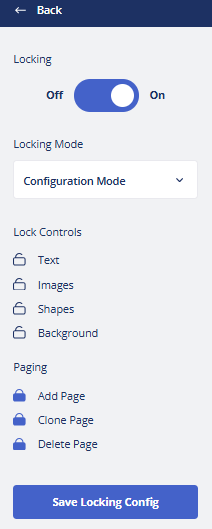
Once you finish setting up your locking, select Save Locking Config.
Individual element locking settings
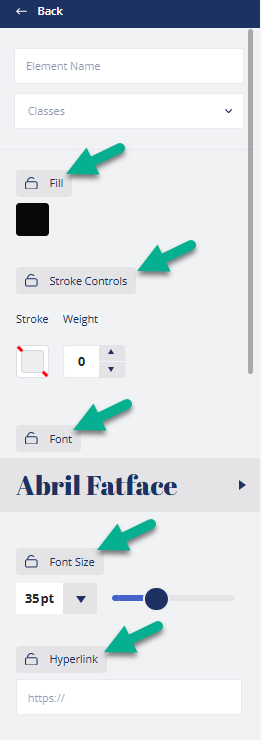
You can set locking settings based on each element in the template.
- Select the element (Text, Images/Media, Shapes, Lines, etc.).
- In the left menu, you find the options to lock properties of the element you selected, for example:
- Fill, Stroke Controls, Font, Font Size, and Hyperlink for Text.
- Vector, raster, and uploading sources for images.
- Weight, resize dimensions, and transparency for shapes.
- Color, photo, and size for background.
- You can find the option to Lock All Attributes in the right menu.
If you want to lock most attributes but leave some unlocked, select Lock All Attributes and then unlock the specific attribute by clicking on the icon next to it.
- The right menu typically has two sections for locking: Position and Context Menu. The Context Menu refers to the menu of options (WYSIWYG) presented to the end-user when they select the object. For text, there will also be an option to lock the Text Content.
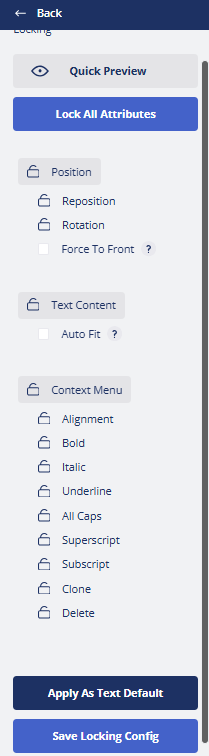
If you want the same locking settings for all the same element types, select one, apply the desired locking settings, and select Apply As [element type] Default.
- Select Save Locking Config.
Auto fit and Force to Front
Autofit automatically adjusts the height and width of the text so that it is contained within the designated size of the textbox. Height is maintained by the line count provided in the sample text you set.
Force to Front keeps the selected element in the design's foreground, even if other elements are added. This ensures that the end user can never cover a required element.
Both of these settings are available in the right-side menu. Once you have selected these options, select the back button and then the Save Locking Config button.
Lock zones
- Select the zone.
- On the left-hand menu, select the Select button to choose which elements can be uploaded into the zone.
- Lock the options that you don’t want available. You can optionally choose to allow uploads of only vector vs raster images.
- Select Raster or Vector to adjust locking for what the user can edit on specific elements added to the zone. Vector images are not available if you choose to mask them.
All zones are displayed by default with a placeholder button for your end users.
Next steps
After you have set up locking configurations, you will save your project and generate a template.